DARE TO BE CREATIVE!

Thursday, January 8, 2015

TBT Mom - My mentor on my sewing journey

 
This is a photo of my parents and me.  I was about a 1 1/2 years old in this photo.  My mom was pregnant with my sister at the time.  This photo hangs on the wall of my studio above my desk.  I'll be adding more photos to this wall as I blog about my Mentors
 
I have to decided to concentrate on my journey in the sewing and crafting world this year in my blogging.  Today I want to recognize my wonderful MOM.  She taught me to sew at an early age.  She told stories of me stringing buttons with a needle and thread when I was only two or three.  People would question her about letting such a small child use a needle and thread but she continued to let me work on those skills that I would use even today. 
 
A very special thank you to my Mom.  She left us much too early at the age of 58 but the life lessons she taught me have been passed on to my son and are now being taught to my two beautiful granddaughters.  I'll do a blog about these two wonderful young ladies and their sewing project next week.

Monday, January 5, 2015

Bento Box Quilt


I began this quilt last year while in Kentucky.  It was the local guild's mystery quilt.  The instructions called for a light neutral for the prominent fabric but I decided to use a gray instead.  We completed two of the blocks at the guild meeting and I did the remainder in KY and back home in Arizona.  The pattern is called Bento Box.   If I were to make this pattern again, I don't think I would add the border.  Since this is for a young lady, I felt that the flowered border added a feminine touch.

The top had been waiting for quilting and was perfect for one of my first longarm quilting projects with Flora.  Flora is so talented.  I just hope I can master some of her wonderful features.

This quilt features an "edge to edge" design from my Pro Stitcher software.  It has stars and swirls.  Below you can see close-ups of the quilting stitches.


It isn't perfect but I'm learning as I go.  I had issues with the tension but overall I'm pleased with the results. I have classes one Saturday a month at Sew for the Heart in Scottsdale.  I have learned so much from fellow longarm quilters. 

The quilt will be a graduation gift for a young lady that's graduating in June.  Now I need to add the gray binding. 

Saturday, January 3, 2015

I'm back in Blogland

After a hectic Fall, I am back to blogging and participating in a wonderful swap over at A Swap For All Seasons.

 I'll  be posting about my experiences with my new longarm quilting machine   This is a photo of the machine. I call her Flora after my great grandmother. I'll explain the connection in later post.  I am so impressed with my Handi Quilter Avante and can hardly wait to show you what I've accomplished in my first month.

Tuesday, September 16, 2014

Owls in the dining room


I will be sharing a few of my summer projects over the next few days.  The owl placemats were one of them.  I attended a quilt show in Pine, Arizona with my sister.  One of the booths had this delightful owl tablerunner on display.  I bought the pattern - "Hoot, Hoot, Hooray!" by Trouble & Boo Designs.  I actually enlarger the pattern for the placemats so my new Fiestaware dishes would fit perfectly.  The fabrics are from my stash.

I machine appliqued the wings, beak, and eyes with monofilament thread.  Batting is a fusible fleece.  I'm very pleased with these little guys.  They are a perfect fit with my brightly colored leather dining room chairs and Danish Modern table.  Later I will do a post of table top with Fiestaware. 

Tuesday, September 9, 2014

My Quilt is Up on the Website!!!!!!!!!

My quilt is one of the featured quilts for today.  Here is the link to the page.

Since the quilt is now official, I will continue my "Sew Along".  See previous post for cutting instructions.


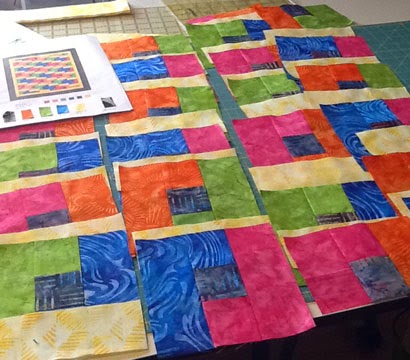
Here are the squares and rectangles ready to sew.  I used Superior Thread's Masterpiece thread for both bobbin thread and top thread.  I use Schmitz needles.


My Janome 15000 is shown here.  It did a wonderful job stitching the blocks.  So easy to set up the machine using the built in patchwork setting.

 
Blocks are finished and now it's time to sew rows and assemble the quilt top.
 
Tomorrow I will share the quilting techniques recommended by QuiltMaker.

QuiltMaker's Back to School Quilting Party - Getting Ready to Sew


Imagine my delight when a box arrived from QuiltMaker with these beautiful Robert Kaufman fabrics.  I just love the bright colors.  Now the process begins.

The quilt is made from 2 1/2" strips.  I decided to use my GO to cut the strips.  With the GO,  I know that each strip will be the perfect width.
 
Once the fabric strips were cut, it was time to cut each strip into the correct number of smaller sections.
 
 
Now the fun began.  It was extremely helpful to have QuiltMaker staff include a color copy of the quilt design.  They also labeled each fabric. 
 
Check back later for more info.

Monday, September 8, 2014

Quiltmaker Magazine's Back to School Party Team Member


I was selected to participate in QuiltMaker's Back to School Party.  It was quite an honor to be selected as one of 8 quilters to make a quilt following the pattern provided.  They provided all the fabric, backing, and batting.  We made the quilt, returned it to the magazine, and they are featuring our quilts this week.  Click here for day one's quilts.


This is my sample quilt that I made prior to receiving Quiltmaker's fabric.  You may recognize the fabric as the same fabric I used on the tote in my previous post.  I thought I needed to make sure I understood the pattern before I cut the fabric provided.  I had just the right amount of this fabric to complete the quilt.  I didn't completely follow the quilting suggestions on this quilt but I love it.


I'm told my quilt will be featured tomorrow.  Check back tomorrow to see my post on making the Back to School Quilt.